(January 2020)
What? Another SBC?!?
Well... what can I say? I have a weakness for these machines :-)
Nerdy addictions are difficult to trace - but I suspect that the origins of this particular obsession can be traced to my first-ever computer: the magnificent ZX Spectrum. A machine from a more civilized era - when men were men, wrote their own drivers, and had no fear of "the guts" of machines.
Let's have a look at the "guts" of the ROCK PI S :-)
The hardware
I received this new toy a few days ago - courtesy of Seeed Studio.
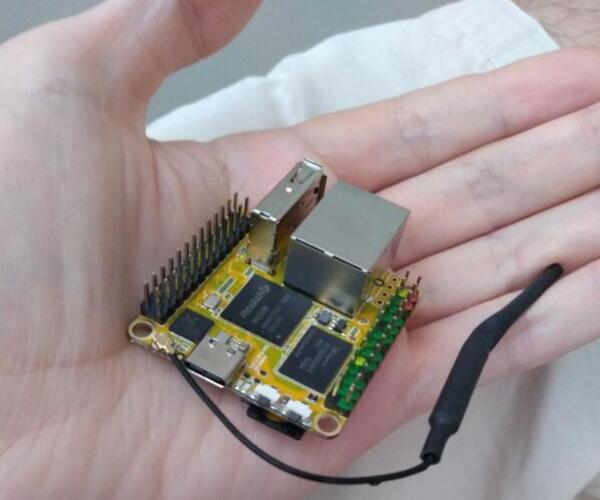
I don't have giant hands - it really is this tiny :-)
What's inside?
- RK3308 Quad A35 64bit CPU
- 256MB or 512MB RAM. My board is the 512MB model, costing ~12 Euros at the time I am writing this.
- USB 2.0 OTG (type-C) and a separate USB 2.0 type-A port
- RJ45 10/100Mbit Ethernet
- 802.11 b/g/n Wifi + bluetooth 4.0 with external antenna connector (antenna not included)
- 26 pin GPIO header
- 26 pin voice/audio header (I2S, PCM, TDM, PDM, SPDIF, and HDMI ARC)
- Dimensions of 1.7 x 1.7 inch (~38.1mm x 38.1mm)
Since I don't have USB-C equipment, I used a simple micro-USB to USB-C adapter to power up the board:
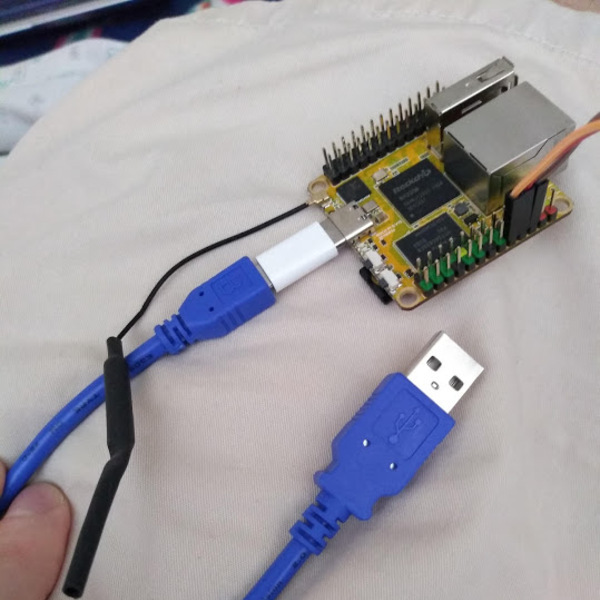
With a micro-USB to USB-C adapter
As I do with all my SBCs, I then setup access to the primary serial port. This is very important; it allows me to interact with the board as early as possible (at boot time), and perform anything necessary to setup the network - to allow easier access (over SSH).
Since this is a 3.3V device, I used my PL2303HX adapter...
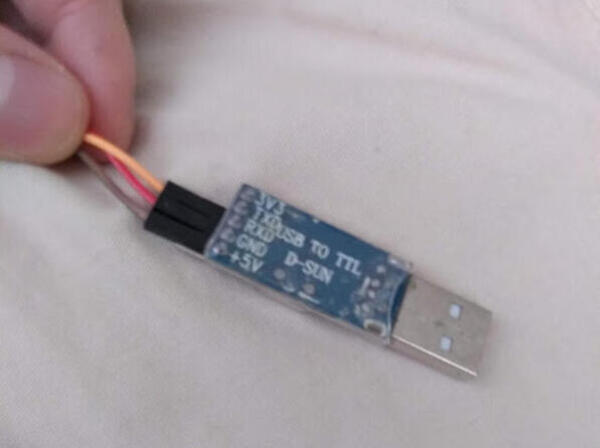
USB-to-TTL adapter. Just connect TX/RX and GND
...and after reading the documentation, connected it to pins 6 (GND), 8 (USB RX) and 10 (USB TX):
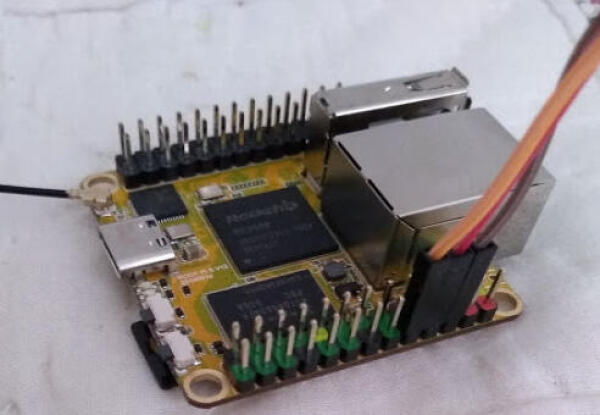
Connecting serial pins.
The software
That took care of the HW setup. But what SW should we run on this tiny machine?
At a high level, there are basically two options with most SBCs (including this one).
- Either you trust the makers of the board with the custom distributions they build (including Android ones)
- ...or you trust Armbian.
I am on the second camp - mostly because I can build the entire, flashable Armbian distribution for my targets from source. This is what I did - and if you have enough experience with Linux and embedded devices, you can do so relatively easily. It involves booting a from-scratch Ubuntu-bionic VM (via Vagrant), and following the build instructions. The Armbian developers have documented everything you need; and note also that the ROCK PI S is indeed shown in the list displayed from compile.sh. Choosing it, the build machinery will download the source code and compile the entire Armbian distribution from scratch, creating an image for flashing.
Then again, if you trust the Armbian developers, you can simply download the pre-built image - and then "flash" it in any micro SD card. With the Debian one, you'd execute something like this:
# ls -l *img
-rw-r--r--   1 ttsiod users 1518338048 Jan 20 07:02
     Armbian_20.02.0-rc0_Rockpi-s_buster_legacy_4.4.207.img

# dd if=Armbian_20.02.0-rc0_Rockpi-s_buster_legacy_4.4.207.img \
    bs=1M oflag=sync iflag=fullblock status=progress of=/dev/sdc
In the example invocation above, my SD card is under /dev/sdc - make sure you
use the appropriate target here, otherwise you will wipe out your own machine's
data! The output of dmesg is your friend here, look at it (and the output
of lsblk) to see the name of the device for your SD.
The sync output flag of dd caused a significant improvement in reliability with
my SD writer. You may or may not need this option - but if you don't use it,
make sure you actually invoke sync after dd is complete. And you will definitely
benefit from a big block size (bs=1M) and a nice and simple progress report
while the writing takes place (status=progress).
Booting Armbian
After that, plugging in the USB-to-TTL adapter shows a new serial port under /dev/ttyUSB0;
and the ROCKPIS is running it at 1.5MBits per second, so we launch minicom
with that baudrate - and see Armbian boot:

(This recording in fact shows my 2nd login - after I've completed the setup and
rebooted to see it all work from scratch. In the first boot, you must login as root,
with the password 1234 - after which Armbian will take care of the remaining setup
actions - and therefore be able to reset your password.
More importantly, you'll also be able to connect to your network! In my case,
I easily connected to my Wi-Fi via nmtui-connect.
Benchmarking CPU performance
After that, I could connect to the ROCK PI S over SSH - and benchmark the device with my renderer.
# apt install libsdl1.2-dev
# wget -q -O - https://github.com/ttsiodras/renderer/archive/v2.3f.tar.gz \
    | tar zxvf -
# cd renderer-2.3f
# ./configure
# make -j4
...
# make bench
My renderer uses all available cores, and stresses the memory and the FPU a lot. You can see results from all kinds of machines running it via the Phoronix test suite.
In terms of the results on my SBCs:
My Orange PI Zero, scored 21 frames per second and rose its temperature above 80C - which forced me to install a fan to keep it cool...
Average value: 21.027340
Std deviation: 0.037930
       Median: 21.017200
          Min: 20.979300
          Max: 21.082800
My Raspberry PI2 reached 58C - and scored 17fps...
Average value: 17.306140
Std deviation: 0.199651
       Median: 17.401600
          Min: 17.064300
          Max: 17.479500
What about the newcomer? Well, the ROCK PI S scored 70% higher than the Raspberry...
Average value: 28.139440
Std deviation: 0.084740
       Median: 28.153200
          Min: 28.003400
          Max: 28.227900
...with a temperature that didn't exceed 76C (shown via armbianmonitor -m).
Very decent result. For its price, this is a nice, 64 bit machine, with more than adequate power for all kinds of IoT processing.
Benchmarking storage
I then wanted to check USB storage performance, so I connected an externally powered USB hub, with a 1TB USB drive attached. I could then measure USB transfer speeds.
Now, I know the port is a USB2 one - but I wanted to see how close we are to the theoretical
maximums. After half a minute of dd-ing raw data (thus avoiding
any seek overheads and seeing the fastest possible result), I got
something close to 31MBytes/second:
root@rockpi:~# dd if=/dev/sda bs=1M | pv  > /dev/null
1.02GiB 0:00:34 [30.8MiB/s]
Not stellar - but then again, this isn't a machine made to be a NAS. For what it is, the ability to connect USB2 peripherals is very welcome.
Power consumption
Putting my USB power meter in the loop, I measured the current going in. During boot, this spiked up to around 300mA - and then settled down in idle, to around 80mA.
Put differently: 0.08A x 5V = 0,4W. 400mWatt!
Very impressive!... Things have really changed since I last measured this; I didn't keep a detailed journal like I did for this board, but I believe the Orange PI Zero was somewhere around 250mA - more than 3 times this little guy.
As for the consumption during the other benchmarks:
when stress-testing with my renderer loading all CPUs at 100% and fully using the floating point unit on all of them, the current consumption reached a ceiling of 370mA. Simply put, the maximum consumption I managed to force on the ROCK PI S, was a bit less than 2W.
When maximising the USB bus usage with
ddfrom an external 1TB drive, the current consumption topped at 150mA (0.75W)
Conclusions
I haven't yet "played" with all features offered by this board - but my overall impression so far is very positive. Given the price of 12 Euros, this machine definitely outperforms my Orange PI Zero (which is basically the only competitor at the same level). It consumes 2x-3x less energy, runs 33% faster, and it's also running at 64bit (which could result in even better comparison results when doing integer arithmetic). I try to avoid this kind of comparisons, though [1]. You don't need them to see that this is quite performant IoT hardware.
I love it that one can buy such machines for this kind of prices - and delegate peripheral processing to "edge" computing.
I just wish one could avoid the shipping costs from China. If you do decide to buy this board, I humbly suggest that you amortize the shipping cost by bundling more goodies in the basket.
It's a good excuse to buy even more things - no? :-)
[1] The reason I avoid sysbench, dhrystones and the like, is because they
really aren't representative "loads". My renderer is a far better overall
stress tester
- checking the performance of integer and FPU calculations, done by multiple cores, while at the same time stress-testing the
memory bandwidth.


| Index | CV | Updated: Sun Nov 19 11:50:03 2023 |