(January 2021)
Let's install Armbian on it, and put it through performance tests.
The hardware
I received the Station M1 a few days ago - courtesy of Firefly.
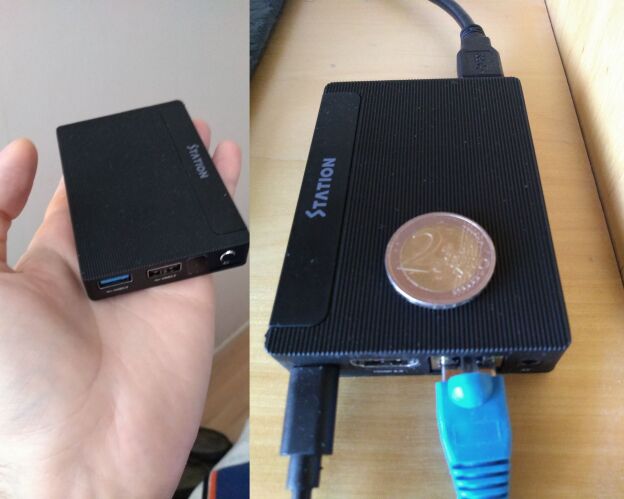
Credit-card sized, inside a metal enclosure
Inside:
- RK3328 Quad-core A53 64bit CPU, at 1.5GHz
- 2GB or 4GB of DDR3 RAM. My board is the 2GB model, costing 65$ at the time I am writing this.
- 8/16/32/64/128GB EMMC for storage; my board came with 16GB. Note: you can also use Micro-SD cards.
- 802.11 b/g/n Wifi (2.4GHz) + bluetooth 4.2. Antenna is included inside the enclosure.
- 26 pin GPIO header - assuming you open the enclosure.
Front:
- One USB3 and one USB2 type-A ports.
- Infrared receiver - the SBC also comes with a remote control
- Micro-SD card slot
- Power button; a sorely missed feature in many other SBCs (forcing people like me to do crazy things).
Back:
- USB-C for power (5V)
- 1x HDMI2.0, supporting up to 4K@60Hz
- RJ45 10/100/1000 (i.e. Gigabit Ethernet)
- 3.5mm audio jack
- All this in credit-card size! See picture with 2 Euro coin for size comparison.
The SBC came with a power adapter, so I plugged it in, connected a Full-HD monitor to the HDMI port, and...
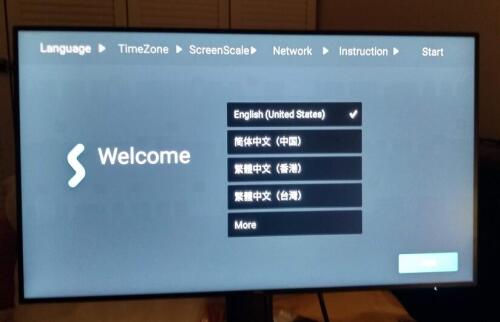
Default setup screen
After 5 minutes of configuration setup, I ended up with a fully operational Android 10 set-top box experience; with the provided remote control allowing easy control of the pre-installed Kodi.
But if you want to see an Android review of this SBC, you are on the wrong
site :-)
I have far more fun hacking Android
than I ever have using it.
So, to quote a famous electronics Youtuber:
"Don't turn it on! Take it apart!"
...and I'll add: "...and then install a fully open-source OS, compiled from scratch".
Keep reading :-)
Disassembly
There are 4 screws holding the enclosure firmly in place. After removing them, the insides of the SBC are easily accessible:
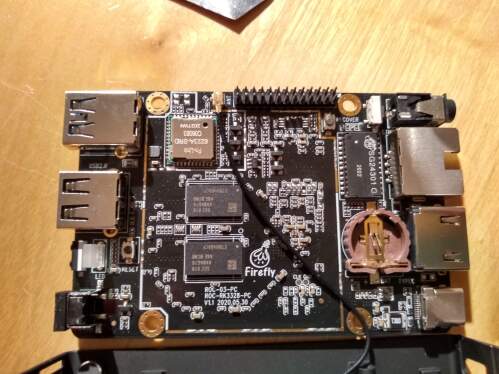
Disassembled.
As you can see, the Wi-Fi antenna is already pre-installed; the two chips giving my SBC 2GB of RAM are easily identifiable; and on the top, the GPIO pins that make SBCs what they are - perfect toys for makers :-)
In case you are wondering, yes, that's a battery slot for an RTC. I always use NTP, of course - but this is a nice perk for usage scenarios where the SBC is not connected to the web.
In the case of the Station M1, the 3 pins shown in the picture below form a 3.3V serial port, that speaks at 1500000 baud - in classic 8-N-1. Any USB2TTL dongle that works with 3.3V levels will do nicely:
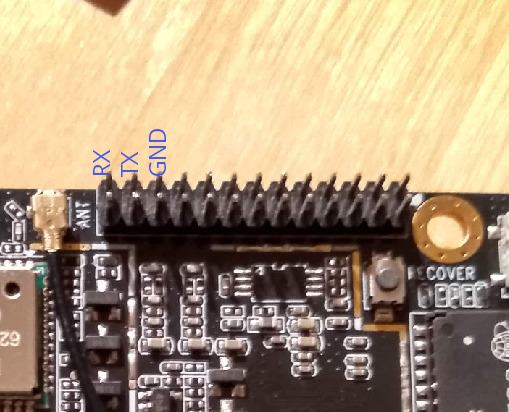
Serial port
The issue of SW - Armbian
At a high level, there are basically two options with most ARM SBCs (including this one).
- Either you trust the makers of the board with the custom
distributions they build (including Android ones).
- Or you trust Armbian.
I am firmly in the second camp. I don't know where the makers of the Station M1 stand on the subject, but as a rule, SBC builders rarely - if ever - update their custom distros. I can't abide by that.
I therefore prefer building the entire, flashable Armbian distribution for my targets myself - from source. There is no better way to trust my SBCs, than knowing that I built their OS myself; and that I can go as deep as I want and debug everything using the source code... From the deepest dungeon at kernel level, all the way to the top-level bash scripts.
Then again, I do this sort of thing for a living. Your mileage may vary.
If you do decide to build from sources, the board is marked in the Armbian repo as CSC - so you need to enable the CSC option during the build, and then choose "Station M1". Other than that, everything just worked; building went just as smoothly as any other flashable Armbian image I've compiled:
$ git clone https://github.com/armbian/build/
$ cd build
$ sudo ./compile.sh
Since it takes some time to do this build, I performed it from an Ubuntu-Focal Droplet that I created in my Digital Ocean account. At a cost of 3 cents per hour and a total build time of approximately 3h, I paid 10 cents to have fully traceable SW for my SBC.
Not bad :-)
Another option you have is to trust completely the Armbian developers - and simply download the pre-built image.
In either case, you then "flash" the image in any micro SD card. In my case, I executed something like this:
# ls -l *img
-rw-r--r-- 1 root root 1816133632 Jan 20 20:06
    Armbian_21.02.0-trunk_Station-m1_bullseye_current_5.10.9.img

# dd if=Armbian_21.02.0-trunk_Station-m1_bullseye_current_5.10.9.img
    bs=1M oflag=sync iflag=fullblock status=progress of=/dev/sdc
When running this command, my Micro-SD card was inside a USB adapter plugged-in and visible under /dev/sdc.
Make sure you use the appropriate target here, otherwise you will wipe out your own machine's
data! The output of dmesg is your friend - look at it (as well as the output
of lsblk) to see the name of the device for your SD writer.
The sync output flag of dd caused a significant improvement in reliability with
my SD writer. You may or may not need this option - but if you don't use it,
make sure you actually invoke sync after dd is complete. And you will definitely
benefit from a big block size (bs=1M) and a nice and simple progress report
while the writing takes place (status=progress).
Most importantly: don't you dare remove the fullblock iflag. Trust me on
this - you need it.
Booting Armbian
After that, I plugged the Micro-SD card in the Station M1, and booted - in a normal, Armbian boot. I didn't use my USB-to-TTL adapter this time; the HDMI cable offered a far easier way to interact with the boot process - and a keyboard plugged in the USB2 port allowed me to easily work with the system.
I then connected the SBC directly to my router (over the Gigabit Ethernet port), setup SSH, rebooted, and SSH-ed into the machine from my laptop.
Since I hate the speed and reliability aspects of Micro-SD cards, I then proceeded to migrate into an external USB3 drive. I can probably migrate into the EMMC, but I chose not to - I prefer to keep it in its pristine ("Android-y") state, for easy re-use when COVID allows me to visit people again. A credit-card sized, portable set-top box is always nice :-)
To migrate to the external drive, I copied everything in the root fs into a freshly formatted 5GB ext partition. The rest of the drive was formatted as a LUKS-encrypted drive, which will take advantage of the crypto instructions in this SBCs ARM cores.
I then modified two files in the SD-card filesystem to make the system boot from the USB drive instead:
- The
/boot/armbianEnv.txtneeds to know where the root fs lives:
# cat /boot/
verbosity=1
bootlogo=false
overlay_prefix=rockchip
fdtfile=rockchip/rk3328-roc-pc.dtb
rootdev=UUID=........-....-....-....-............
The device UUID is easily obtainable via blkid -c /dev/null.
- The
/etc/fstabshould also point to the proper root. So the proper UUID needs to appear there:
# cat /mnt/usb/etc/fstab
UUID=... / ext4 defaults...
That's it - the SBC now works from reliable, fast storage.
How fast is it, with USB3 storage?
Well, don't take my word for it - let's watch it in action:

What you can see in this asciinema video:
This (110MB+ per second) is the same speed I have seen with this mechanical external USB3 drive on any of my computers (including PCs). No slowdowns in the Station M1.
Did you notice the temperature of 37C? This is my coolest SBC yet... The metal enclosure and the thermal pad it uses to attach on the SoC perform their work admirably.
Benchmarking CPU performance
OK, but what if we stress the machine? Let's benchmark the device with my renderer.
# apt install libsdl1.2-dev
...
# wget -q -O - https://github.com/ttsiodras/renderer/archive/v2.3f.tar.gz \
    | tar zxvf -
# cd renderer-2.3f
# ./configure
# make -j4
...
# make bench
My renderer uses all available cores, and stresses the memory and the FPU a lot [1]. You can see results from all kinds of machines running it via the Phoronix test suite.
For completeness, I include the results from all my ARM SBCs - so you can compare for yourself.
- Raspberry PI2: it reached 58C - and scored 17fps...
Average value: 17.306140
Std deviation: 0.199651
       Median: 17.401600
          Min: 17.064300
          Max: 17.479500
- Orange PI Zero: It scored 21 frames per second and its temperature rose above 80C. That forced me to install a fan to keep it cool...
Average value: 21.027340
Std deviation: 0.037930
       Median: 21.017200
          Min: 20.979300
          Max: 21.082800
- ROCK PI S scored 28fps, with a temperature that reached 76C:
Average value: 28.139440
Std deviation: 0.084740
       Median: 28.153200
          Min: 28.003400
          Max: 28.227900
- Station M1: Let's watch the newcomer live:

The Station M1 scored 32.7 fps. It never exceeded 1.3GHz while doing so, which makes me think there's more potential here - the Armbian defaults can probably be bumped up. Not that I need more horsepower (it offers more than what I need) but it's still nice to know there's room to grow.
Also, very importantly - notice that even though we stressed the machine to
an extreme - all cores fully utilised (see second run with top in the
first tmux pane for confirmation) the temperature never went above 53C.
The enclosure barely felt warm during the test; nothing even remotely concerning. From a thermal perspective, amongst all my ARM SBCs, this is the one I trust the most.
Network
Is it truly a Gigabit device?
Well, the best way to confirm it, is to use another machine
on the same Gigabit network, to send/receive data and benchmark via iperf3.
Again, let's see it done live:

That looks like Gigabit to me :-)
Power consumption
OK - so we know this is a more than fast enough SBC, with fast USB3 storage and Gigabit networking. But how does it fare in terms of power consumption?
I revert the configuration to a Micro-SD based boot - to see how we score without an external USB3 drive attached:
I place my INA219-based power meter in the loop, and record the current going in (I have an ESP8266 getting the data of the INA219 over I2C, and transmitting the measurements over WiFi to my laptop. Probably a subject for another blog post :-)
As shown in the video, during the boot the device fluctuates from 250mA to 550mA.
When it settles down, it idles at 170mA.I then launch my renderer, which uses all 4 CPU cores - and the current usage stays solidly between 480-500mA.
It's not recorded in the video; but I then plug my external USB3 drive, so the SBC's power supply now "feeds" both the SBC and the mechanical USB3 drive.
Current now jumps up to an idle usage of 370mA. Since this is a 5V supply, we are talking about 1.85W for this mini-NAS.
With the drive still attached, I re-launch my renderer. With all cores fully utilised, the consumption rises to an almost rock-solid 720mA (3.6W).
And finally, I stress the USB3 drive - i.e. I fetch data from it at maximum speed, with
pv -ptebar. The consumption hovers around 900mA; i.e. a bit less than 5W.
Conclusions
I haven't yet exercised all features offered by this SBC. I am especially looking forward to playing with its OpenGL capabilities :-) ...but my overall impression so far is very positive. The combination of the metal enclosure with a respectable performance at a low power consumption, while giving Gigabit networking and USB3 speeds, makes it a very nice machine indeed.
Aeons ago, I used SPARCstations - back when I was a student. And I was more than happy with what I could do with their 40MHz brains.
To see now these ARM devices offer so much power, in credit-card-sized enclosures... It is really mind-blowing.
I've seen it all, methinks :-)
[1] The reason I avoid sysbench, dhrystones and the like, is because they
really aren't representative "loads". My renderer is a far better overall
stress tester
- checking the performance of integer and FPU calculations, done by multiple cores, while at the same time stress-testing the
memory bandwidth.
- My Atomic PI adventures
- Turning an Orange PI Zero into my pet "beast"
- Experimenting with a Rock PI S.


| Index | CV | Updated: Sun Nov 19 11:50:03 2023 |